
Q: Can I close the gap between IVAR doors?

Do you mind the IVAR gap?

Over on our FB group, Amy asked this question: “We’ve just built our IVAR cabinet and put the doors on, to discover a gaping hole in the middle of the doors!

IVAR gap problem

I’ve messed about with all the screw on the hinges, but it doesn’t seem to make a difference.

Anyone got this and had the same issue? Thanks!”

Well, she’s not alone in this. If you’ve ever assembled an IVAR cabinet, you would have faced this. In fact, any IKEA cabinet with 2 doors has this issue.

It seems more prevalent on the IVAR, though, maybe partly due to the curved edge design.

But don’t lose heart. There are …

Ways to minimise the infamous IVAR gap

#1 Adjust the hinges

First, do what IKEA tells you to.

Herman suggested this video showing how the various screws affect the door position.

Which corresponds to the instructions on the assembly manual.

The first adjustment is to get the two doors level. So if one door is higher than the other, loosen the two screws that hold the hinge to the frame and gently nudge the door to the right position, then fasten again. (If you have someone to help you hold the door in place, it’ll be so much easier.)

adjustments

Once you got the level of the doors right, you now tackle the hard bit — the front-to-back and side-to-side adjustment. I’ve found that you’ll need to make both adjustments bit by bit.

adjustments
adjustments

Adjust, stand back to check the alignment, adjust again. Till you get it as close as possible. Mine still has a 3mm gap, which is fine by me.

#2 The IVAR Gap Kit

If nothing works, maybe the IVAR Gap Kit will. I’ve not tried it but it promises to remove the annoying gap in no time.

IVAR Gap Kit

Credit: Evernow.nl

Simply place 1 spacer from the IVAR Gap Kit behind each hinge, after which the space (Gap) between the doors will disappear. Like magic! 

IVAR Gap Kit

Credit: Evernow.nl

If anyone has tried this, please let us know if it works as advertised. Find out more about the IVAR Gap Kit.

#3 Cover it up

This one is from A Beautiful Mess. They got rid of the gap completely with a thin piece of 2″ wide basswood, glued on one of the doors.
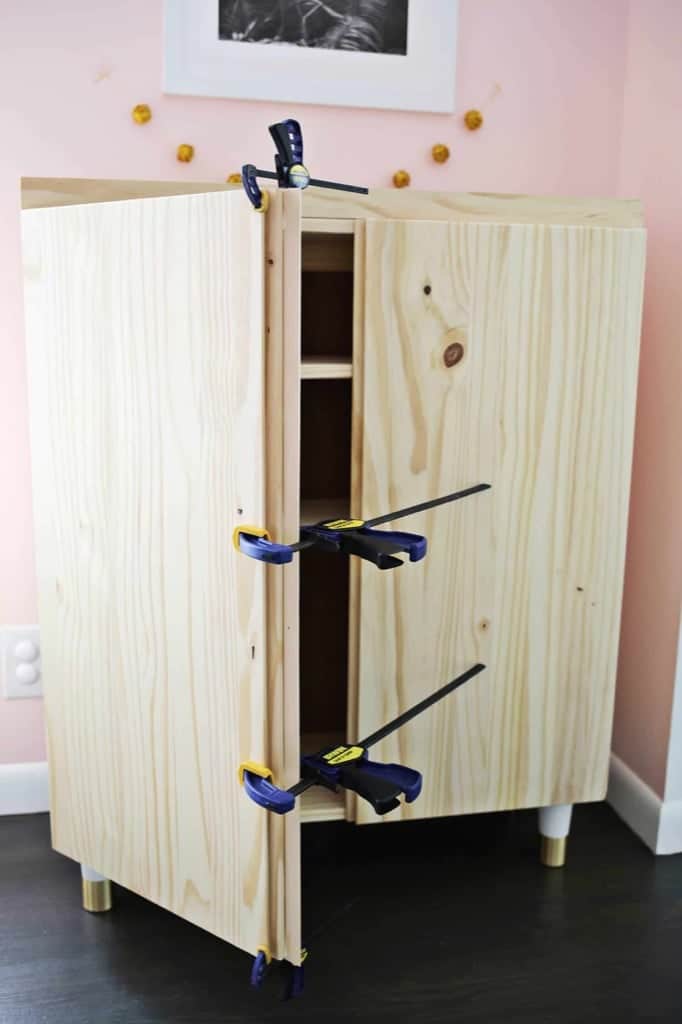
IVAR Gap closed

Et voilà! Gap gone.

IVAR Gap closed

Credit: A Beautiful Mess

#4 Learn to love the gap

There are gaps but they don’t distract from the beautiful simplicity of the IVAR. Embrace the gap!

IVAR

Happy hacking,

Jules

The post Q: Can I close the gap between IVAR doors? appeared first on IKEA Hackers.

Comments

Popular posts from this blog

SKÅDIS: 5 ways to make the IKEA pegboard even better

IKEA introduced its own pegboard system, SKÅDIS, two years ago and I’d say it’s one of the best systems IKEA launched in recent years. I love how super customisable it is, with a growing range of accessories that help keep things organized. It works everywhere, in your wardrobe to bathroom . Probably anywhere you have a flat surface to hang it up. Photo: IKEA.com SKÅDIS pegboard system See it on IKEA.com But no matter how perfect a system, you can trust IKEA hackers to improve on the SKÅDIS. And they’ve settle these 5 issues you may have faced with the handy IKEA pegboard. Read on for their fixes. 5 IKEA SKÅDIS issues and fixes #1 Expensive hooks? You’ll need quite a number of hooks and accessories to fill up the SKÅDIS pegboard, and Kenyer was shocked at how quickly they all added up. So he figured he could make his own hooks to save cost. Photo: Kenyer Over at Instructables , he shows us how to twist copper wires into the SKÅDIS hook shape. It works s...

KALLAX desk ideas: Three ways to set up a workstation

Three great ideas for a KALLAX desk . #1 Compact, minimalist desk for laptop I put together a KALLAX desk for my laptop for just under 25 euros. Just a KALLAX 2×2 is needed. No other materials required. IKEA item used: KALLAX 2 x 2 (77 x 77 cm) KALLAX 2×2 | IKEA.com All you need to do is assemble 3 of the pieces in a U shape. That is all.  If you want to strengthen the structure you would need to drill a couple of holes in order to use the long middle shelf of the KALLAX unit as a back reinforcer. Easy and it works. ~ by Fabio Tudela #2 KALLAX standing desk I choose to stand at work because it makes me feel infinitely more productive. Our department recently moved into a new building and we had the opportunity to design our own spaces. Items Used: VIKA AMON / TORNLIDEN table top x 2 (discontinued, replaced by LINNMON ) KALLAX 4 cube x 2 KALLAX drawer unit x 2 8 – 3″ locking casters / wheels 1 – 6′ zinc brace I had a few VIKA AMON tables ...

Hackers Help: How to remake cam lock holes?

I want to put a 78.5” wide PAX configuration in a 77” space for a kids room . My plan is to eliminate the drawer on the right unit, then cut the shelves and rails to be 1.5” narrower. My question is, how do people attach two laminated pressboard IKEA pieces after they’ve cut off the cam lock holes? Related: See more Hackers Help questions and answers . Are they using drills bits and/or tiny hole saws to remake the cam lock holes? Or screws drilled in from the outside with wood glue? The outside pieces won’t be visible in my completed setup so I could go either way. I’m curious what other people are doing, either I haven’t seen this detail in past hacks or I haven’t been paying attention. ~ by Jenny *** Hi Jenny The best and tidiest method is to use the cut-off portion as a template to reproduce the same cam lock holes in the correct positions. The right sized drill bits and a  Forstner bit should do the trick. A Forstner bit will drill a flat-bottomed hole (...