
No doubt about it. BILLY is made for built-in bookshelves

The goal behind the IKEA hack was to create a useful division in the basement.

We had a really long wall that needed something to separate the games area from the media area.

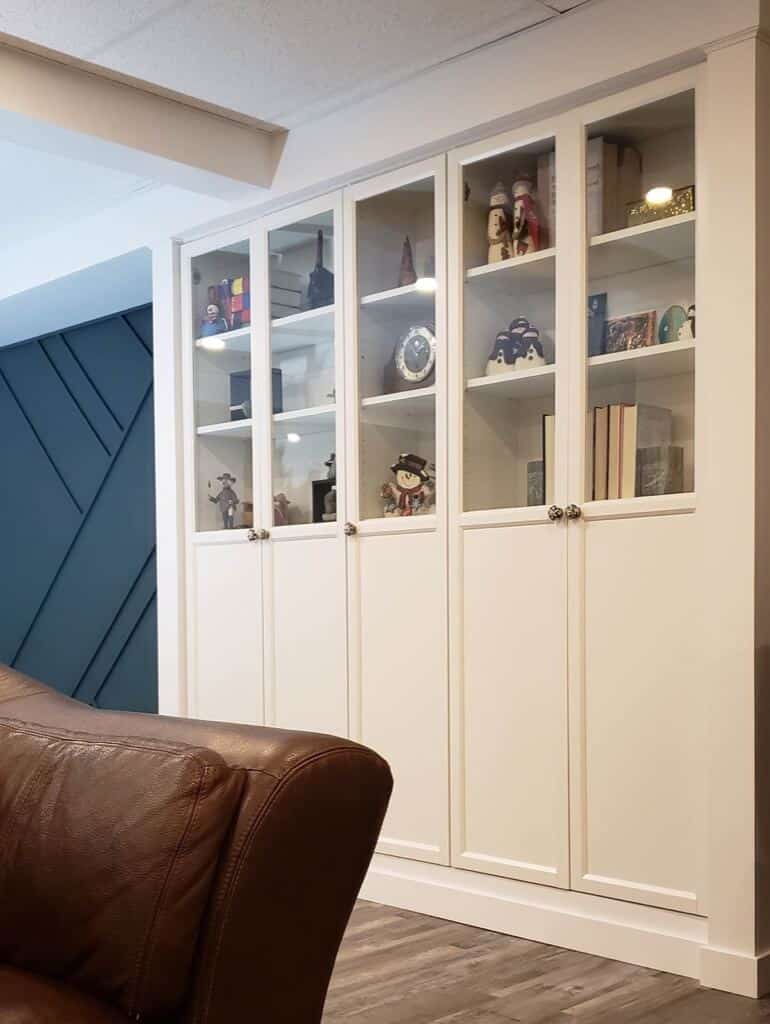
What better way than to introduce more storage and some built-in bookshelves.

DIY built-in BILLY bookshelves

Items used for BILLY built-in bookshelves
  • BILLY bookcases + half glass doors
Other materials:
Tools:

Steps I took to build the BILLY built-in bookshelves

1. I started out by framing out the two walls that flanked either side of the bookshelves using 2×4’s. I wanted these to act like walls framing in the built-in BILLY bookshelves, thus I needed the walls deep enough to recess the BILLY’s in about 1 1/2 inches from the finished front.

DIY built-in BILLY bookshelves

2. After the framing was complete, I assembled the IKEA BILLY bookshelves for a rough fit. It is absolutely essential that everything fits snug. At this stage, you can still easily make changes.

DIY built-in BILLY bookshelves

3. Next is to secure the BILLY bookshelves to each other. Use screws of the right length, so it won’t poke through the other side of the BILLY unit.

DIY built-in BILLY bookshelves

Once all of the BILLY bookshelves are joined, go ahead and secure them to the framed walls with 2 1/2″ screws.

4. It is time to start closing in the framed walls. I used MDF for this project because I wanted them to look like trimmed out walls and not just a drywall wall. Remember to check for plumb-ness.

DIY built-in BILLY bookshelves

Then, fill any of the joints and nail holes with drywall putty. Let it dry, and then give everything a good sanding.

5. Prime all of the MDF and then paint.

DIY built-in BILLY bookshelves

6. Now is time to install the finishing trim. For my project, I went with an inside quarter round along the top. This covers the joint between the drywall bulkhead and MDF, as well as the small gap above the built-in bookshelves.

DIY built-in BILLY bookshelves

For the bottom, I used the same baseboards as the rest of the basement (standard 1×4″ MDF baseboards). Again, this helps provide continuity to the entire space, tying the built-in BILLY’s with the rest of the renovation.

Fill the gaps and nail holes with drywall mud, give it a light sand, and then finish off the new trim with a final coat of paint.

7. The last step is to install the BILLY doors and hardware. We replaced the regular BILLY knobs with white and grey ceramic pumpkin knobs.

DIY built-in BILLY bookshelves

I made a YouTube video instruction to go along with this build. It can really help explain some of the more finicky steps about how I settled on specific measurements.

The post No doubt about it. BILLY is made for built-in bookshelves appeared first on IKEA Hackers.

Comments

Popular posts from this blog

Hackers Help: How to attach headboard to ESPEVÄR mattress base?

I’m trying to figure out if a headboard can be attached to an Espevar Mattress Base , and how to accomplish that. I’m looking at a standard metal headboard (because I just prefer the look of curved metal to what IKEA offers) and am not interested in a slat base with just a mattress on top, and a wall mounted headboard is not an option due to renting. Thanks for any help! ~ Amy *** Hi Amy I’ve not seen the ESPEVÄR in person but I believe it is possible to attach a headboard to it. From the website, the ESPEVÄR looks like a regular wooden slatted mattress base under a bed base slipover. As to how to attach it, that will depend on the fittings on the metal headboard. So you will just need to get the right hardware to secure the metal headboard to the wooden frame. And make some small openings on the slipcover to let the fixtures to go through. Jules Photo: IKEA.com Try these free-standing headboards for size A lime green and white headboard that takes centerstage in the r

Should You Decorate for the Holidays If Your Home is on the Market?

‘Tis the season to be jolly, but should your home reflect the joy of the season if you’re also trying to sell it? If you love to decorate for the holidays, missing out on this once-a-year opportunity might sound like torture. On the other hand, you don’t want to miss the chance to sell your home because of your decorations. So, should you decorate for the holidays if your home is on the market? We’ve got some “nays,” “yeas,” and “other considerations.” No, Don’t Decorate An elaborately-decorated home in Houston. Image: Regina Gust Designs Our first two realtors are against decorating for the holidays if you’re trying to sell your home. According to Anita Springate-Renaud, licensed partner and broker at Engel & Völkers Toronto Central , your festive decor can distract buyers from looking at the home’s raw design. “Elaborate decorations can distract and shift a prospective buyer’s focus away from what they should be looking at when shopping for a property.” So what should they

Turning 2 SVARTA loft beds into one big double loft bed

One double loft bed coming up! I felt like I had too little living space. I wanted a loft bed, but still loved my ‘old’ 160 x 200cm IKEA mattress. There seemed to be no IKEA or even other affordable 160 x 200 double loft bed options. Then, my boyfriend suggested getting two second hand IKEA loft beds and making it into one. I set out to find whether someone did this hack. I found many people asking if it could be done, but to my surprise, nobody seems to have documented trying it. So I decided to be the one to just do it and share it for anyone that wants to do it too. IKEA items used: SVARTA loft bed x 2 (and in my case, my old IKEA wooden slatted bed bases at 200 x 80cm x 2 and my well loved IKEA 160 x 200cm mattress). Photo: IKEA.com Of course, you can buy everything new. You have the option to choose the 2 wooden slatted bed bases like I did with a 180 x 200cm mattress. Or stick with the metal bed base provided and use two 90 x 200cm mattresses. (Though you might hav