
Before you splurge, check out this $15 DIY pedalboard

As a guitarist and dad, I was searching for an affordable way to keep my effect pedals all secured and easy to move as my toddler likes to rearrange them while I play, disconnecting cables and cords as he fiddles with knobs and buttons.

Professionally built pedalboards (like these) can cost an arm and a leg. This was a flash of inspiration while looking for something else, as often happens at IKEA.

Materials:
  • GREJIG shoe shelf
  • Zipties, large and small
  • A basic linesman plier

$20 DIY Guitar Pedalboard made from IKEA shoe rack

Time: About 1 hour

Cost: $20 CAD (approx. $15)

The product I picked up for my DIY pedalboard is the GREJIG shoe shelf, which is $5 CAD ($3.99).

I also grabbed a 100-pack of 14″ black zipties from the hardware store. That was the longest I could find, for about $13 CAD, as well as some smaller zipties for about $2. Which brings this project’s cost to a whopping $20 (not counting my guitar gear, of course!).

I’d recommend setting up the legs of the GREJIG for the assembly process, which allows you to feed zipties and cables through the grid.

$20 DIY Guitar Pedalboard made from IKEA shoe rack

DIY pedalboard – layout

Then, figure out a pedal layout that works for you. This will probably be the most time-consuming part of the whole project.

The GREJIG is 12″ × 24″, which can neatly handle larger pedals like a wah, and has a sturdy metal 1″ grid. When laying out the pedals, ensure that their jacks have at least two squares open next to them to accommodate a right-angle input jack.

If you have a ton of pedals, just get more GREJIGs and lay them out so that you can chain them together!

$20 DIY Guitar Pedalboard made from IKEA shoe rack $20 DIY Guitar Pedalboard made from IKEA shoe rack $20 DIY Guitar Pedalboard made from IKEA shoe rack

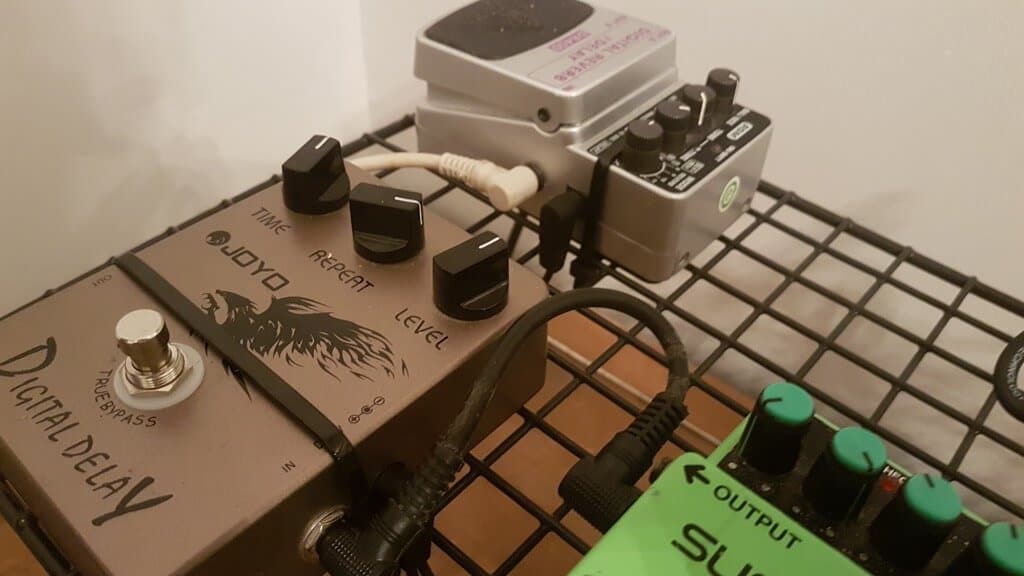
I’d also recommend putting expression pedals on the sides of the board, as the center will be a little springy. I liked the added response to the feel of activating a pedal, especially the quiet Boss units. But you may not – if you like things solid, you might want to put together a simple layered wooden base for it to sit in.

DIY pedalboard – securing the pedals

Once you are good with your layout, use the large zipties to attach the pedals to the grid, making certain that they do not interfere with pedal functionality.

This is where you need long ties – my Russian Big Muff Pi was barely contained by 14″ ones.

Use a pair of pliers to help get things as tight as you can. Once properly tightened, you should be able to hold your pedalboard upside-down with no shifting.

$20 DIY Guitar Pedalboard made from IKEA shoe rack $20 DIY Guitar Pedalboard made from IKEA shoe rack

Once your pedals are strapped on, run the power cables. I chose to run mine under the grid so that moving audio cables would be less annoying, but you could run it on top. Ziptie it to the grid with the smaller ties to help prevent mechanical damage.

The nice thing about the grid-like construction of the GREJIG and using zipties is that when you inevitably want to rearrange your board, all you need to do is cut the ties and you’re ready to reassemble.

Once the legs are folded down the board has a remarkably small profile. It would be fairly easy to put together a small carrying case out of plywood to keep it safe while travelling. But that’s a project for another day!

That’s about it! I hope you enjoyed this DIY pedalboard tutorial!

$20 DIY Guitar Pedalboard made from IKEA shoe rack

~ by Garrett Everett


See more DIY pedalboard hacks


The post Before you splurge, check out this $15 DIY pedalboard appeared first on IKEA Hackers.

Comments

Popular posts from this blog

SKÅDIS: 5 ways to make the IKEA pegboard even better

IKEA introduced its own pegboard system, SKÅDIS, two years ago and I’d say it’s one of the best systems IKEA launched in recent years. I love how super customisable it is, with a growing range of accessories that help keep things organized. It works everywhere, in your wardrobe to bathroom . Probably anywhere you have a flat surface to hang it up. Photo: IKEA.com SKÅDIS pegboard system See it on IKEA.com But no matter how perfect a system, you can trust IKEA hackers to improve on the SKÅDIS. And they’ve settle these 5 issues you may have faced with the handy IKEA pegboard. Read on for their fixes. 5 IKEA SKÅDIS issues and fixes #1 Expensive hooks? You’ll need quite a number of hooks and accessories to fill up the SKÅDIS pegboard, and Kenyer was shocked at how quickly they all added up. So he figured he could make his own hooks to save cost. Photo: Kenyer Over at Instructables , he shows us how to twist copper wires into the SKÅDIS hook shape. It works s...

KALLAX desk ideas: Three ways to set up a workstation

Three great ideas for a KALLAX desk . #1 Compact, minimalist desk for laptop I put together a KALLAX desk for my laptop for just under 25 euros. Just a KALLAX 2×2 is needed. No other materials required. IKEA item used: KALLAX 2 x 2 (77 x 77 cm) KALLAX 2×2 | IKEA.com All you need to do is assemble 3 of the pieces in a U shape. That is all.  If you want to strengthen the structure you would need to drill a couple of holes in order to use the long middle shelf of the KALLAX unit as a back reinforcer. Easy and it works. ~ by Fabio Tudela #2 KALLAX standing desk I choose to stand at work because it makes me feel infinitely more productive. Our department recently moved into a new building and we had the opportunity to design our own spaces. Items Used: VIKA AMON / TORNLIDEN table top x 2 (discontinued, replaced by LINNMON ) KALLAX 4 cube x 2 KALLAX drawer unit x 2 8 – 3″ locking casters / wheels 1 – 6′ zinc brace I had a few VIKA AMON tables ...

Amped up KURA bed with drawers and safety rail

We saw other KURA beds with storage drawers underneath on this site. So, we also wanted the same — to make space for LEGO s and wooden trains under the bed. We installed the additional headboard panels because the configuration of the room and the location of the windows in the room meant that we wanted the children’s heads on the right and the ladder on the left. The KURA plans did not seem to allow this configuration, though I have seen online that there are models of this bed from 2003 that allowed more options for setup. Additional safety features Safety rail panel for the lower KURA bed helps our two year old feel secure, as he just transitioned from a crib directly to this bunk. Likewise metal handles on the ladder. They added a lot of confidence for both the five-year-old and the two-year-old when climbing up to the top bunk. We are aware that the bunk is now even higher than before and both children are under 6. Use caution and common sense before making these modifi...