
Hackers Help: Help me turn this built-in bed into reality

Please please please,
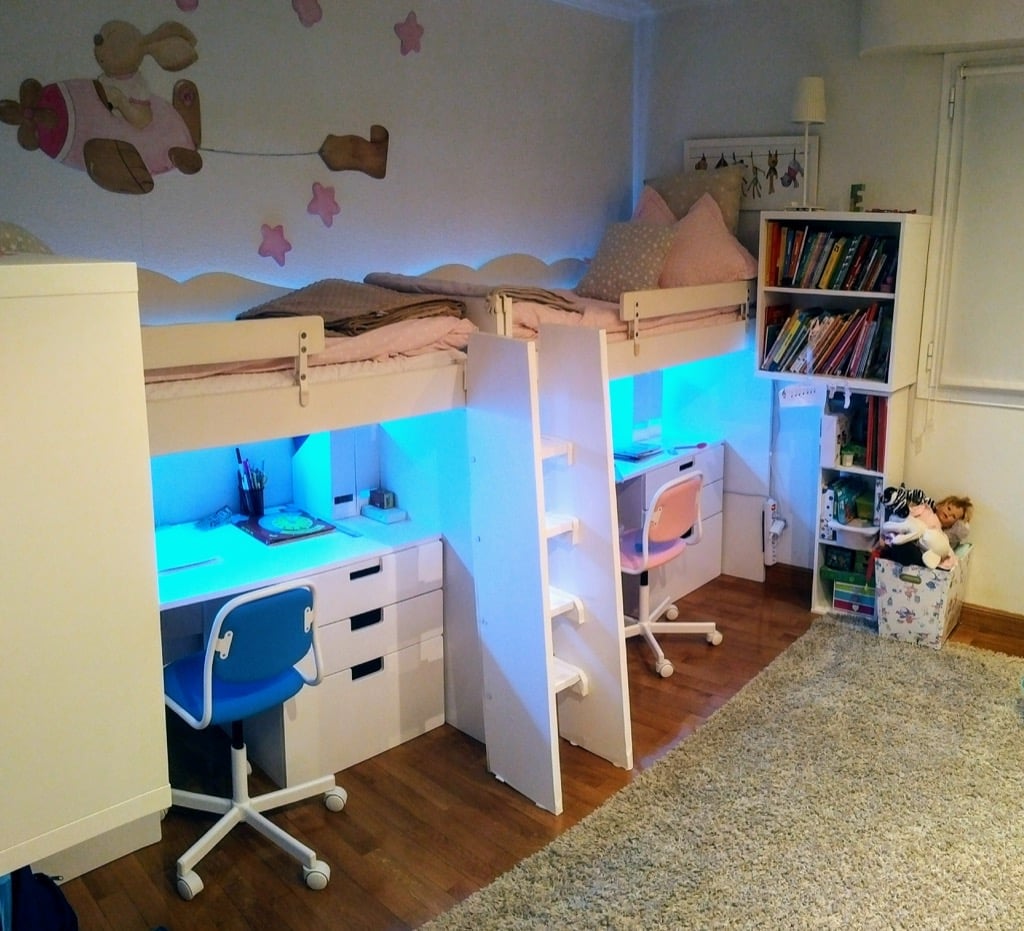
Do you have any idea how to set up this built-in bed with IKEA furniture?

Help me turn this bedroom into reality

Source unknown

I’m willing to do it if you could only give me help on which furniture would fit to build up this kind of bed.

I’ll be happy to share the step by step plan once I get the furniture name.

~ by Stefan

***

Hi Stefan

The built-in bed is a pretty ambitious project and I’m glad you’re up to the challenge. 

There are many ways to skin the cat and quite a few IKEA products may fit the bill. You choice will depend on your budget, skillset and what you’re comfortable working with.

#1 KURA and TARVA built-in bed combo

First off, I think the KURA reversible beds and TARVA beds are the obvious choice. Both are made of solid pine, which would make them play nicely together.

The easiest would be to have two KURA beds on top and slot in the TARVA queen beds at the bottom. But the KURA is quite low (45 5/8 “) so there is hardly enough headroom for the beds beneath, like so: 

Help me turn this bedroom into reality

If you wish to go with this, you’ll need to elevate the KURA beds

You’ll also need to close up the exposed legs for the built-in look.

#2 MYDAL and TARVA

So, on second thought, I would suggest building a wood structure (like how GeekDad did for the TROMSÖ bed) and use the 2 bunks of one MYDAL bunk bed.

Separate the bunk beds into 2 single beds. Position the top bunks high enough for comfortable headroom below. The TARVA queen beds should slot in well here too. Again, add trim, moulding, paint to beautify it.

elevated bunk beds

#3 KRITTER + MALM

The same can be achieved with KRITTER junior beds. Aitor replaced the KRITTER’s head and foot boards with new “legs” made of wood boards to raise them. Aitor reinforced the bed using lateral stiffeners. This way the beds were strong enough. But the addition of some lateral buffers from wall-to-wall made the beds more stable.
Kritter loft bed

Another way to raise them up is to prop the beds with another piece of furniture like the KALLAX or STUVA. This could also serve as the landing of the staircase. Do secure the beds well to the furniture.

KRITTER loft bed

The KRITTER would go well with the MALM queen beds. This combo would probably look most like your all-white built-in bed inspiration photo.

#4 Stairs

As for the stairs, it would be better to build it from scratch as part of your structure in #2. That would look a lot more cohesive.

But if you rather not, you could use the most popular stair hack — the TROFAST staggered storage. The end step could be a STUVA wardrobe to raise it into a set of full-height bunk bed stairs.

trofast bunk bed stairsOr make it a lot more sturdy and built-in, like this.

So that’s my recommendations for you. I would suggest getting all the measurements of your room and dimensions of the IKEA products of your choice. If you do live near an IKEA, do take a look at the pieces and study them.

Then, start planning it out on paper. Be as detailed as possible as that will help you arrive at what works best for you.

For more help, join our IKEAhackers Facebook Community, where we share our hacks and get help from one another.

Good luck on your hack and we hope to see the finished results soon!

What other suggestions and advice on hacking this built-in bed? Please drop a line in the comments below. 

Happy hacking,

Jules

The post Hackers Help: Help me turn this built-in bed into reality appeared first on IKEA Hackers.

Comments

Popular posts from this blog

SKÅDIS: 5 ways to make the IKEA pegboard even better

IKEA introduced its own pegboard system, SKÅDIS, two years ago and I’d say it’s one of the best systems IKEA launched in recent years. I love how super customisable it is, with a growing range of accessories that help keep things organized. It works everywhere, in your wardrobe to bathroom . Probably anywhere you have a flat surface to hang it up. Photo: IKEA.com SKÅDIS pegboard system See it on IKEA.com But no matter how perfect a system, you can trust IKEA hackers to improve on the SKÅDIS. And they’ve settle these 5 issues you may have faced with the handy IKEA pegboard. Read on for their fixes. 5 IKEA SKÅDIS issues and fixes #1 Expensive hooks? You’ll need quite a number of hooks and accessories to fill up the SKÅDIS pegboard, and Kenyer was shocked at how quickly they all added up. So he figured he could make his own hooks to save cost. Photo: Kenyer Over at Instructables , he shows us how to twist copper wires into the SKÅDIS hook shape. It works s...

Enjoy Sweet Dreams With These DIY Headboard Ideas

A headboard is one of the last things you see before you fall asleep and one of the first things you see when you wake up. Demonstrate your unique design style by creating your own. Below are some ideas and tips to get you started. Do you think the formula for sleep is on this London bedroom’s headboard? Image: Clifton Interiors Ltd Chalk headboard Create this look with a can of black chalkboard paint. Almost any type of wall – drywall, plaster, wood, brick or concrete – will work, as long is it is properly prepped. Chalkboard paint is easy to apply, dries fast and can be cleaned with soap and water. But you’re not limited to the color black – chalkboard paint comes in just about every color. If you don’t want to use paint, consider chalkboard contact paper – and yes, you can use chalk on it. An Edmonton hockey-themed room. Image: Cameron Homes Hockey goal headboard For the ultimate hockey fan, nothing beats a hockey goal headboard. Complete the scene with a team blank...

Sliding Bookcase Doors KALLAX hack to divide your rooms

I replaced single-glazed sliding doors that divided the sitting room and dining room with a sliding KALLAX bookcase. For one “door”, I used two 2×2 cubes and one 2×1 unit. As we already owned 4 separate KALLAX 2×2 cubes and they seemed to be exactly the same width as the internal doors, we thought it might be possible to stack them. With one additional 2×1 KALLAX they almost matched the height of the internal doors. Sliding KALLAX bookcase doors in closed position First, still a work in progress but let us show you how it looks from the dining room, when the units are pushed together to close up the doorway. And the units pushed apart to enter the living room. We can access the storage cubes from both sides — from the dining or living room — which is so very useful. What I like most is, when viewed from the living room, when closed, it looks almost like a built-in unit. IKEA item used: 2×2 KALLAX units x 4 1×2 KALLAX units x 2 Other materials: 3M mounting tape...