Kids outgrown the IKEA crib? Reinvent it into another useful piece of furniture. The SNIGLAR or GULLIVER is awesome in the laundry room, even in the kitchen and study.

IKEA SNIGLAR and GULLIVER crib | IKEA.com
3 ways to use IKEA SNIGLAR crib for laundry
Michal shares 3 wonderful ideas for an old unused IKEA SNIGLAR crib. The crib is repurposed to now hang the never ending heap of laundry.
All 3 hacks are made from one SNIGLAR crib using the sidewalls only, original fasteners, additional screws, a piece of board and 4 caster wheels.
You don’t not need much tools except for a handsaw, sand paper, and cordless drill.
#1 Extension to ladder towel rail
The problem with ladder towel rails is that bathroom towels constantly fall down from the rail. And not many towels can be dried all at once. And what if you have other odd shaped washing to be dried? Here’s our solution.

1. Measure the width of your straight ladder towel rail warmer.
2. Cut the SNIGLAR bars to fit the width and slot it into the towel rail.
3. The protruding bars serve as pegs for towels and other washing.
#2 Portable drying rack

1. Cut one of the sidewalls of the crib and remove the top rail that hold the bars together.
2. Cut the top rail into two equal pieces and make a notch in the middle.
3. Fasten the sidewall cut in Step 1 onto the notched pieces.
Just place this portable dryer in front of the fireplace or central heating system and let the clothes dry out.
#3 Large capacity laundry basket
Get rid of piles of dirty clothes lying around. With this hack you will build a robust basket that you can move with ease.

1. Cut both the long sections of the sidewalls of the crib and the short sidewall. Remove the legs as well.
2. Join them together using the original fasteners and additional screws where necessary.
3. Get a board to create the base. We added extra length at the side and back to serve as wall protection.
4. Screw the board into the sidewalls from under the board.
5. Add casters.
6. Staple firm fabric inside the cavity.
7. Roll it into the space beside your washing machine.
See how we hacked it. Link to video.
~ by Michal
#4 IKEA crib drying rack
This wall mounted retractable laundry rack will hold up a load of washing. Very useful if you have a small laundry area. You can use the IKEA GULLIVER or SNIGLAR crib for this purpose. Picture below shows the GULLIVER.

Use straight mending plates to join the sidewalls together. You can use one section or two sections, depending on how tall a rack you need. But more than two is not recommended as the rack may get too heavy with a full load of laundry. Then attach the rack to the wall using two heavy duty hinges. Finish with a pulley and rope and a cleat hook to hold it in place. See the full tutorial. (SNIGLAR version.)
#5 Cookie drying rack
Need a drying rack for your baked goods? Much cheaper and easier to have IKEA make it. Read more.

#6 Kids desk
The little one is ready to write and draw. Adjust the height of the cross bar by drilling mounting holes at appropriate height and turn the crib into a kids desk. See details of the kids desk project.

#7 Computer desk from old crib
The desk setup can work for adults too.
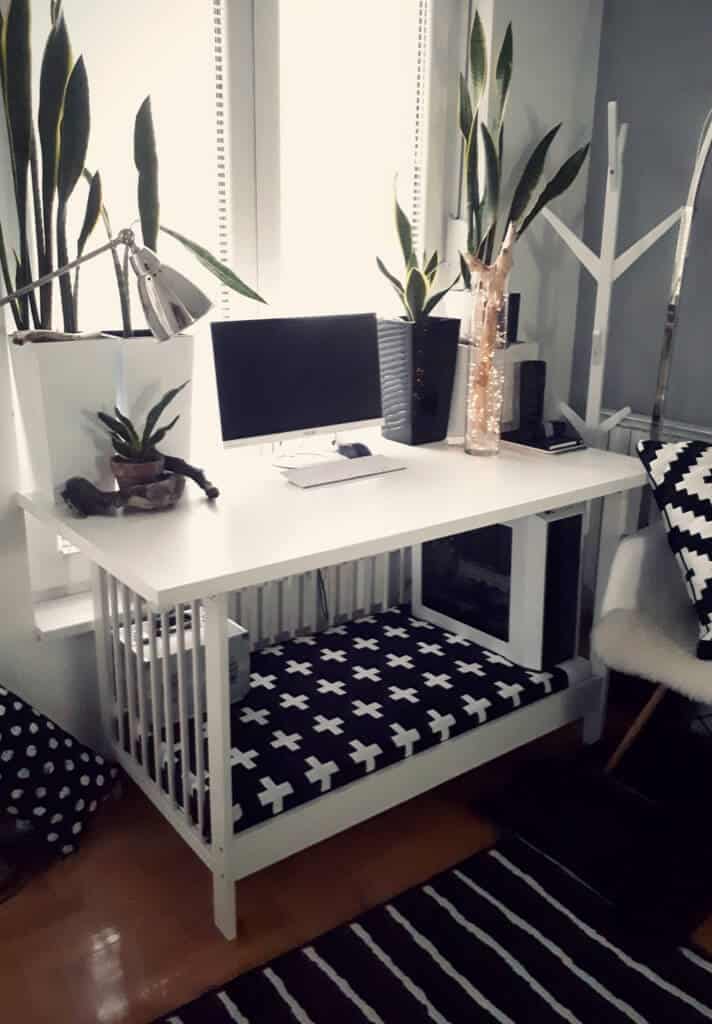
Andrijana made a computer desk from her son’s old IKEA GULLIVER crib. Add an IKEA LINNMON table on top and secure the table top to the crib frame with L-brackets. If you prefer more legroom, flip the crib over and place the table top on the “feet” of the GULLIVER instead. See the tutorial.
First published on April 10, 2017. Updated with new content.
The post 6 money saving ideas to upcycle your old IKEA crib appeared first on IKEA Hackers.


Comments
Post a Comment