BILLY corner bookcase installed without the angled unit in the middle.
I came up with a solution for my home office that would enable me to use two 80cm and one 40cm wide BILLY, all with glass doors.
Now this would all only FIT into my office space if I could position the BILLY bookshelves at 90º degree right angle to each other.
The standard IKEA BILLY corner unit (pic below) would not work in this space.

IKEA BILLY corner unit | IKEA.com
I also wanted all to have height extensions as an open book and manual display.
Inventory of IKEA products
- 2 x 80cm BILLY bookcase in veneer white Birch
- 1 x 40cm BILLY bookcase in white
- 2 x 80cm white height extension
- 1 x 40cm white height extension
- Extra Glass Shelves for 40cm BILLY
- Extra Glass Shelves for 80cm BILLY
Door list
Tools & Materials List

92 x 18mm 5.4m 3.5inch x 3/4 inch DAR Primed Finger Jointed Pine Moulding*. 2 Lengths required. (* Measure height of BILLY with height extensions less 1 mm to get length of timber)

Stanley 8m Tape Measure | Zenith 8G x 30mm Countersunk Rib Head Chipboard Screws – 100 Pack | Staedtler Medium Carpenters Pencil | 250ml PVA Wood Glue | 18V Drill Driver Kit

600mm Aluminium Spirit Level | Empire 180mm Laser Etcher Rafter Square | Wall Anchor Setting Tool | Wall Anchors| Mitre Box And Saw Set
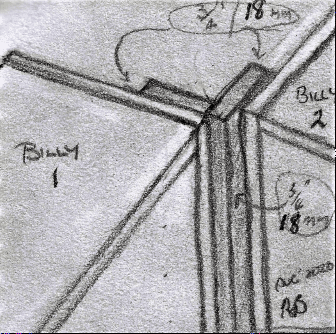
The solution I roughed out in sketch paper.


3D Sweet Home helped me visually place the BILLY bookcases into the small office and see whether it was workable and doable.
The Application also helped me maximize bang for storage outcome for space occupied.
Related: Alternative IKEA BILLY bookcase. Using the BENNO for the corner
Here’s how I made my IKEA BILLY corner bookcase:
My solution is to make a 90 degree wood bracket using pine moulding. For a neat finish, this bracket should be as tall as the entire BILLY corner bookcase plus extensions.
To make the bracket, secure the two pieces of wood to each other at 90 degrees using screws.
Then, secure the two BILLY Bookcases to the wood bracket from the back of the bracket into the bookcase. Use wood screws to secure the bracket along the entire height of the bookcases. Be careful to leave a 3/4″ margin in front to allows the doors to open.
When it’s all fixed and in place, add the doors as per IKEA instructions.
Progress pictures


I also used the recommended fixing to walls by IKEA for BILLY bookcases. These were bracketed to the wall with the supplied wall brackets. They were fixed with firm anchoring with steel crimped bolt threads into plaster board with 1/2 bolt threads. See picture of tool crimper and plaster fixers used.
How long did it take and what’s the cost?
The cost of materials came up to less than $20AUD, not including the BILLY bookcases.
And it took about 16 hours to do modifications.
What was the hardest part of this hack?
The hardest part of the hack was adjusting the IKEA hinges so that the doors would not jam against one another.
I kept the top door gaps linear and the spacing even via careful hinge adjustments.
Here it is, my 90 degree corner BILLY bookcase finished and in place.


What do you like most about the hack?
I love the result as it is neat and tidy. And keeps my things dust free.
The display is outstanding and makes use of space efficiently in my small home office.
This modification stands as one of my BEST renovations in my 40-year history.
I love making the home a place of peace and excellence for easy living.
My partner is amazed at the result.
My daughter thinks it is outstanding.
~ by Ross Brisbane
The post 90 degree corner installation of IKEA BILLY with Doors appeared first on IKEA Hackers.


Comments
Post a Comment