The exterior of your home is constantly exposed to the elements; the wind, rain, sun and changing temperatures help to age your home. To ensure that your home stands the test of time you will need to monitor building exterior for wear and damages.
Exterior Wall Coverings
There are many exterior wall coverings that have been used and are being used today. Here is a few!
- Wooden trim and components
- Peeling and blistering is common on painted surfaces. Common causes are moisture under the paint, improper paint application or excessive paint build-up. Total paint removal or moisture vents can be used to correct the problem.
- Wood elements should also be checked for mildew stains, fungus and insect damage.
- Check that wooden elements to ensure they are a good distance from the grade. In areas with snow you will want to ensure that piled snow does not come in contact with the wood. Avoid piling gardening materials against the walls to prolong the life of your wooden components.
- Asbestos cement shingles
- Asbestos is a hazardous material and should be handled with care. You do not want to cut, break or sand asbestos shingles. Asbestos is not used in building materials anymore and can be removed completely or covered.
- Aluminum and vinyl siding
- Aluminum and vinyl siding is low-maintenance and can easily checked for deficiencies. You can check for loose, missing, bent or broken pieces. This is especially important after storms. You can also check caulked joints; pay special attention to the areas around windows.
- Stucco
- Stucco should be checked for cracks, crumbling or any area that has the potential for water penetration.
- Cracks in stucco can either be caused be initial shrinkage of the material, building settlement or movement behind that wall that should be investigated by a professional.

- EIFS (exterior insulation and finish system)
- Consists of several layers: insulation board, mesh and base coat layer, finish coat and sealant and flashing. There is both non-draining and draining EIFS. Most EIFS is installed over wood and is non-draining. The biggest risk facing non-draining EIFS is water penetration leading to rotting of the wood framing. Adequate flashing is vital to the system.
Foundation Walls
It is easy to visually inspect your foundation walls for cracking, moisture intrusion and deterioration. This should be part of your regular home maintenance plan.
Windows and Doors
- Windows
- Window frames, sashes and sills should be monitored because conditions change over time.
- Storm windows and doors should be checked for operation, condition, fit and weather tightness. You will want to ensure that weep holes are not blocked which could lead to rotting and water intrusion.
- Weatherstripping
- Ensure that weatherstripping is held in place securely and free from dents, straightness, brittleness and cracking
- Garage Doors
- You will need to check the operation of your garage door as well as the overall condition. Depending on the materials used you should look for rotting rusting, cracking and splitting.
- Garage doors may be motorized or operated manually. Check for speed, smoothness ensure it runs quietly and that the safety-reversing device is functioning properly.
Other Exterior Components
- Decks
- Ensure supports and structural connections are secure and in good condition. Decks should be sloped to direct water away from your home.
- Look for signs of deterioration, rotting or cracking.
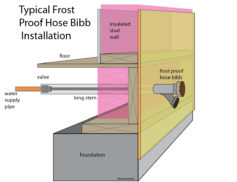
- Exterior Water
- Hoses should be removed from the home during the winter months.
- Hose spigots should be frost-proof
- GFCI (Ground-Fault Circuit Interrupter)
- All exterior receptacles should have GFCI protection
Now that spring is in full bloom take a look around your home to ensure you are ready for the spring and summer storms.
The post Protecting the Exterior of Your Home appeared first on Edmonton Home Inspector | Admirable Inspection Services.
Comments
Post a Comment