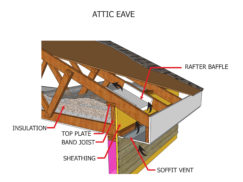
With energy efficiency in the news it is a hot topic and can make your home more comfortable and save you money. The most common misconception is that drafts are the biggest contributor to energy loss when in reality attics and basements are usually the biggest contributor. Warm air rises and can be lost through your attic if leaks are present. These leaks can be difficult to find and the help of an inspector certified in thermography can help find these leaks.
Once you know what needs to be done you can perform some repairs on your own as long as the attic is accessible and you can move around easily. Simple fixes such as sealing air leaks and adding insulation will help to reduce your energy costs and make you more comfortable. If you find a more serious problems such as leaks, mold etc you will want to contact a reputable contractor.
Things to Remember
You will need to have a work light to make sure you are able to see clearly. Personal protective equipment is also a must. You will need kneepads, coveralls, gloves and a hat. Insulation is itchy and you will not want it coming in contact with your skin. You may find mold or other irritants so an approved respirator is recommended but if not available a high-quality dust mask is a must.
Be aware of your surroundings. Ensure you walk on joists or truss’ and are watching for sharp nails and things sticking out above your head. Remember if you feel that the attic is dangerous in any way do not complete any work your self and hire a professional.
Biggest Gains
The areas that will have the greatest impact on your comfort and energy costs will be large areas of leakage. Leakage is likely to be the greatest behind attic knee walls, dropped ceiling areas and where walls meet the attic floor. Watch for dirty insulation as this is caused by air moving through it.
Once you have looked after the larger holes move to the smaller holes. Use expanding foam or caulk to seal the openings around plumbing vents and electrical wires remembering to replace insulation.
One area that can be forgotten is the attic access. Ensure that the attic hatch is sealed with weatherstripping and that the attic hatch has a piece of fiberglass or rigid foam board the same size as the hatch glued to the back.
Ducts
Checking ducting for leaks can be a big energy saver. This is fairly simple to do with mastic or foil tape. Once this is taken care of you will want to ensure that HVAC ducts are properly insulated.
Attic Insulation
Proper insulation levels in your attic are very important to your homes energy efficiency. You can take a look in your attic and check the insulation level. If your insulation is even or below the floor joists or you see low spots more insulation is needed.
Insulation levels are specified by an R-value. An R-value is the measure of insulation’s ability to resist heat flow. The higher the value the higher the insulating value. The recommended level for most attics is R-38 depending on the climate and type of attic floor. When topping up your insulation you do not have to use the same type that is already present. Remember never to lay insulation over soffit vents or recessed lighting. Insulation must be at least 3 inches from lights are insulated ceiling rated.
Stack Effect
You can think of a stack effect like a chimney. During the winter warm air is pushed up through the home and out of the attic sucking colder air in through the basement which makes the home feel drafty. During the summer months the opposite occurs. Cooler air settles and is pushed out of the basement through spaces and cracks and hot air is sucked in through the top of the home. Sealing these holes and gaps can go a long way to increase comfort and save money on heating and cooling bills.
We have covered a few areas in the home that can effect your overall comfort level as well as increase your energy bills. It can be beneficial to look at your home as a whole and come up with a whole-house energy-efficiency plan. All the components of your home work together so ensuring they work efficiently together is beneficial.
The post How to Make your Home More Energy-Efficient appeared first on Edmonton Home Inspector | Admirable Inspection Services.
Comments
Post a Comment