
No space for a kitchen clock? How about this!

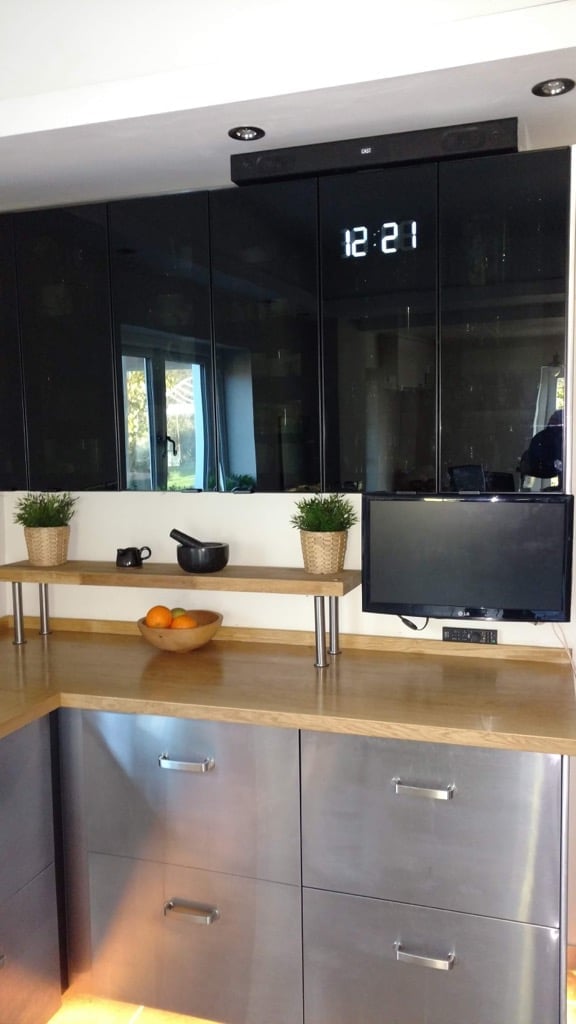
The problem with an uncluttered kitchen was finding a place for a kitchen clock. Two years later I had a eureka moment for a place for this ‘3D LED’ clock, powered by a regular USB charger. A glue gun fixed it in place.

Total time 10 minutes to find USB cable and 10 minutes to find glue gun = 20 minutes.

Total cost
£10 – £15 for the clock which may or not come with a charger.

IKEA item used:
  • Used IKEA JUTIS door – other see-through furniture doors may be suitable.*
ikea jutis kitchen door

JUTIS | IKEA.com

Other materials:
  • Digital kitchen clock
  • Glue gun
  • USB cable

Related: Make a countdown timer using IKEA clocks


Instructions for digital kitchen clock

First, get the clock. Search eBay, Amazon or Gearbest for 3D white LED clock and check the dimensions. The 400mm JUTIS black glass door has a space for a 190mm clock.

My clock is 210mm long so it’s glued behind the door at an angle until I find a smaller size clock. But hey, it works! (It doesn’t seem to matter if the leftmost hour digit is obscured – that hour position only shows a ‘one’).

Cool kitchen clock built into black Jutis glass door

*Works with other stuff
This idea not only works with the black JUTIS door on IKEA Kitchens, it ought to work with the diffused glass or plastic doors found on other IKEA storage.

Cool kitchen clock built into black Jutis glass door


Related: A gorgeous bamboo wall clock for your kitchen


Cool kitchen clock built into black Jutis glass door

Oh and another thing. The space above the kitchen wall unit was just tall enough to fit a Sony sound ‘bar’ that’s normally used under a TV. This model HT-X2 has Chromecast built-in so you can use a Google device to play music while your food cooks.

Cool kitchen clock built into black Jutis glass door

~ by Roger Fro


You may also like these IKEA clock hacks


The post No space for a kitchen clock? How about this! appeared first on IKEA Hackers.

Comments

Popular posts from this blog

SKÅDIS: 5 ways to make the IKEA pegboard even better

IKEA introduced its own pegboard system, SKÅDIS, two years ago and I’d say it’s one of the best systems IKEA launched in recent years. I love how super customisable it is, with a growing range of accessories that help keep things organized. It works everywhere, in your wardrobe to bathroom . Probably anywhere you have a flat surface to hang it up. Photo: IKEA.com SKÅDIS pegboard system See it on IKEA.com But no matter how perfect a system, you can trust IKEA hackers to improve on the SKÅDIS. And they’ve settle these 5 issues you may have faced with the handy IKEA pegboard. Read on for their fixes. 5 IKEA SKÅDIS issues and fixes #1 Expensive hooks? You’ll need quite a number of hooks and accessories to fill up the SKÅDIS pegboard, and Kenyer was shocked at how quickly they all added up. So he figured he could make his own hooks to save cost. Photo: Kenyer Over at Instructables , he shows us how to twist copper wires into the SKÅDIS hook shape. It works s...

Hackers Help: How to remake cam lock holes?

I want to put a 78.5” wide PAX configuration in a 77” space for a kids room . My plan is to eliminate the drawer on the right unit, then cut the shelves and rails to be 1.5” narrower. My question is, how do people attach two laminated pressboard IKEA pieces after they’ve cut off the cam lock holes? Related: See more Hackers Help questions and answers . Are they using drills bits and/or tiny hole saws to remake the cam lock holes? Or screws drilled in from the outside with wood glue? The outside pieces won’t be visible in my completed setup so I could go either way. I’m curious what other people are doing, either I haven’t seen this detail in past hacks or I haven’t been paying attention. ~ by Jenny *** Hi Jenny The best and tidiest method is to use the cut-off portion as a template to reproduce the same cam lock holes in the correct positions. The right sized drill bits and a  Forstner bit should do the trick. A Forstner bit will drill a flat-bottomed hole (...

6 Clever & Easy IKEA FLISAT Table hacks for more Fun & Play

The IKEA FLISAT children’s table is quite a smart little thing. See those white covers? It’s a secret compartment. Open them up and you’ll fit 2 TROFAST storage tubs snug under the top of the table. Your child can reach in and get his or her LEGO bricks -– and then — most importantly, sweep everything down into the bin to clean up. Or at least that’s what we all hope the kiddo does! It’s also perfect for sensory play. Instagram is full of ideas on what to add to those tubs to maximise them. Think of filling them with rice, pasta or chickpeas, you name it, to develop fine motor skills. Read on to see how you can make the $50 table work harder for so much more fun. #1 Simple mod turns the IKEA FLISAT into a Play & Craft table Lauren has a very simple yet practical hack to turn the FLISAT children’s table into a play table with more storage and better organisation. Materials: Photo: IKEA.com FLISAT table with TROFAST tubs ONSKLIG change table containers Wood bracket ...