Running out of kitchen cabinet space? Make use of your ceilings for a hanging pot rack and get them all within easy reach.
#1 A small hanging pot rack in the pantry
I have always wanted a hanging pot rack but didn’t like the idea of displaying pots in the kitchen. So, I wanted my pot rack to be hidden in the pantry.
But I have a small corner pantry and most of the pot racks available were too big to fit in my pantry.
Then, when I came across the GREJIG shoe rack I instantly thought about using it for DIY pot rack.
I ordered OOTSR SS ceiling hooks and Sonku 39 inch decorator chain from Amazon, $16.99 each. And for under cdn $45, I now have this DIY hanging pot rack in my pantry.

IKEA item used:
- GREJIG Shoe rack ($4.99 each)
- KUNGFORS S hook ($2.99 for 5 per pack)
Other materials from Amazon:
Tool:
Shoe rack for pots:
Hold the shoe rack upside down on the ceiling and mark where you want the pot hanger to hang from the ceiling.
Place the ceiling hook plate on each spot and mark the 3 holes where screws will go. Use a smaller bit to drill holes in drywall.

Then place hooks, insert anchors and drill in screws.
Attach connection locks at the ends of Sonku chain to each leg and hang the chains from the ceiling.
Finally, adjust the height of the rack.
~ by Nupur Dabral
#2 Two to flank the hood

Materials:
- Article # 902.023.72 BUCKLA Handle (585mm) / 2 pack $19.99
- Article # 301.110.87 LAMPLIG Trivet $6.99
- Some 1-1/2″ x ¾” strips of fir lumber 2 @ 11″ and 2 @ 23″
- Assorted screws, glue, varnish, etc.
Tools:
- Saw
- Drill
- Screwdriver
- Hammer
- Chisel
DIY hanging pot rack hack
I thought IKEA would have hanging pot racks (for the ceiling), but they didn’t. So since I was already in IKEA, I thought I could buy enough components there to make some…
Turns out I could.
I’m pretty happy about these… my first IKEA hack.
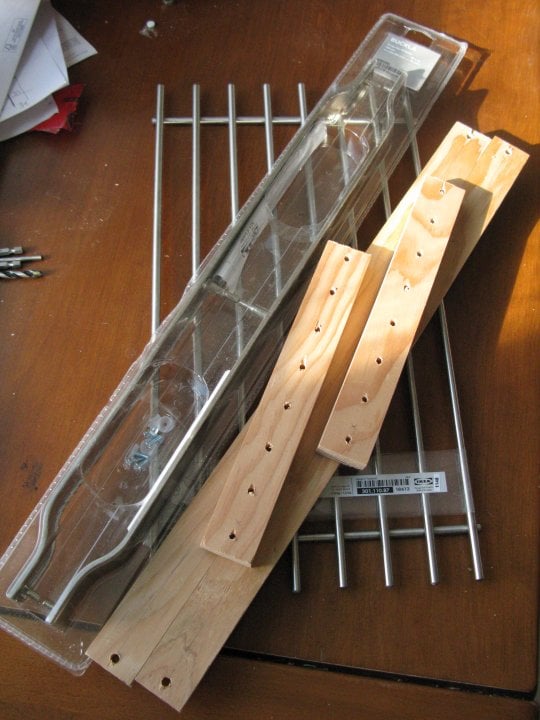

The BUCKLA handles (discontinued, found on eBay) come with a template for hole spacing, but you’ll have to figure out where to drill the holes for the trivet, since there are small variations from trivet to trivet.
I placed the trivet on the wood and gave each rod a slight tap, leaving a dimple on the wood, where the holes needed to be. That worked really well for me.
Cast iron pots and pans weigh an awful lot, so when you are assembling this, it is probably a good idea to make sure everything is well fitted and glued and screwed. Don’t need them falling apart!
~ Mark Reynolds, Churchill, Manitoba, Canada
#3 Hold it up with magnets
If you don’t have enough headroom for the pots to hang down, this magnetic pot holder is a neat idea.

Fix a magnetic memo board like the SVENSÅS (or the old SPONTAN pictured above) to the ceiling. Then place strong magnets on the board, where you’ll like the pots to stick to. It’ll hold up all your steel pots! See the full tutorial.
#4 Use a rail as a pot hanger

A single-bar ceiling-mount pot rack is perfect for a small kitchen. Install one or two KUNGSFORS rail to the ceiling. Add the hooks and hang up your pots.
#5 Hang them under a shelf

Why not make use of the space under the shelf to hang your pots? Add a curtain rod through the wall brackets (such as the SANDSHULT) and hang away.
Originally post on August 1, 2012. Updated with new content.
The post 5 hanging pot racks to keep pots & pans within reach appeared first on IKEA Hackers.


Comments
Post a Comment