
TV Stand gets new look aka get rid of scratches on the bench top

LIATORP series is nice, but it has a problem with the finishing – the surface scratches easily etc, especially for the pieces, like the TV stand, with tabletops.

TV Stand gets new look aka get rid of scratches on the bench top


Related: Affordable contemporary wooden top TV bench


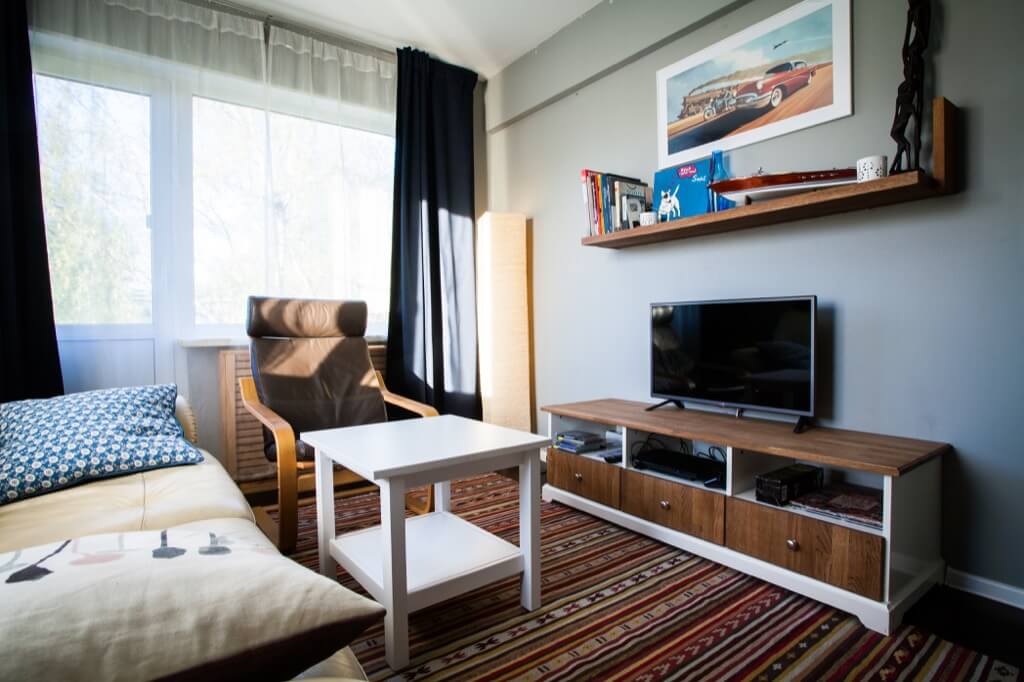
So one day I decided to repair the original tabletop of my TV stand. I sanded off all original paint, repainted it. But the quality of the repainting made it even worse than it was before. It was then that I got the idea to completely change it.

TV Stand gets new look aka get rid of scratches on the bench top

IKEA items used:
  • LIATORP TV stand
IKEA LIATORP TV stand

LIATORP | IKEA.com

Other materials and tools:

How I gave a new look to the old LIATORP TV stand

I purchased solid oak edge glued panel. (It was slightly thinner than the original LIATORP tabletop – 20 mm against 23-24 mm). Then I cut it in the same dimensions as the original, made a nice edge with a wood router, sanded it with 150 grit.

Then I stained it with Danish oil + Mixol Universal Tint #23. The first photo was taken with artificial light, so it’s not true to color. You can see the actual color in the next photo.

TV Stand gets new look aka get rid of scratches on the bench top

TV Stand gets new look aka get rid of scratches on the bench top


Related: Made to measure oak and BESTÅ TV stand. See the tutorial.


After that, I drill all the holes for screws on the underside as per the original tabletop, and secured the new top to the bench.

TV Stand gets new look aka get rid of scratches on the bench top

Next, I’ve wanted to change the drawer fronts as well. So, I disassembled the boxes, measured the fronts, and made new ones from the same solid oak as the table top, and finished them with the same oil.

I’ve also changed the handles to metal ones, and here is what I have now:

TV Stand gets new look aka get rid of scratches on the bench top

~ by Alexandr

The post TV Stand gets new look aka get rid of scratches on the bench top appeared first on IKEA Hackers.

Comments

Popular posts from this blog

SKÅDIS: 5 ways to make the IKEA pegboard even better

IKEA introduced its own pegboard system, SKÅDIS, two years ago and I’d say it’s one of the best systems IKEA launched in recent years. I love how super customisable it is, with a growing range of accessories that help keep things organized. It works everywhere, in your wardrobe to bathroom . Probably anywhere you have a flat surface to hang it up. Photo: IKEA.com SKÅDIS pegboard system See it on IKEA.com But no matter how perfect a system, you can trust IKEA hackers to improve on the SKÅDIS. And they’ve settle these 5 issues you may have faced with the handy IKEA pegboard. Read on for their fixes. 5 IKEA SKÅDIS issues and fixes #1 Expensive hooks? You’ll need quite a number of hooks and accessories to fill up the SKÅDIS pegboard, and Kenyer was shocked at how quickly they all added up. So he figured he could make his own hooks to save cost. Photo: Kenyer Over at Instructables , he shows us how to twist copper wires into the SKÅDIS hook shape. It works s...

Hackers Help: How to remake cam lock holes?

I want to put a 78.5” wide PAX configuration in a 77” space for a kids room . My plan is to eliminate the drawer on the right unit, then cut the shelves and rails to be 1.5” narrower. My question is, how do people attach two laminated pressboard IKEA pieces after they’ve cut off the cam lock holes? Related: See more Hackers Help questions and answers . Are they using drills bits and/or tiny hole saws to remake the cam lock holes? Or screws drilled in from the outside with wood glue? The outside pieces won’t be visible in my completed setup so I could go either way. I’m curious what other people are doing, either I haven’t seen this detail in past hacks or I haven’t been paying attention. ~ by Jenny *** Hi Jenny The best and tidiest method is to use the cut-off portion as a template to reproduce the same cam lock holes in the correct positions. The right sized drill bits and a  Forstner bit should do the trick. A Forstner bit will drill a flat-bottomed hole (...

6 Clever & Easy IKEA FLISAT Table hacks for more Fun & Play

The IKEA FLISAT children’s table is quite a smart little thing. See those white covers? It’s a secret compartment. Open them up and you’ll fit 2 TROFAST storage tubs snug under the top of the table. Your child can reach in and get his or her LEGO bricks -– and then — most importantly, sweep everything down into the bin to clean up. Or at least that’s what we all hope the kiddo does! It’s also perfect for sensory play. Instagram is full of ideas on what to add to those tubs to maximise them. Think of filling them with rice, pasta or chickpeas, you name it, to develop fine motor skills. Read on to see how you can make the $50 table work harder for so much more fun. #1 Simple mod turns the IKEA FLISAT into a Play & Craft table Lauren has a very simple yet practical hack to turn the FLISAT children’s table into a play table with more storage and better organisation. Materials: Photo: IKEA.com FLISAT table with TROFAST tubs ONSKLIG change table containers Wood bracket ...