Long before it became popular on TikTok, we’ve been featuring IKEA platform bed hacks made from IKEA EXPEDIT shelving units, and later, KALLAX units.
Why a platform storage bed?
It’s not surprising that it is one of the most enduring IKEA hacks and is replicated again and again.
Firstly, you can have it in various configurations — from King to Single bed size.
Secondly, it is a very affordable way to get a bed AND storage. It’s awesome for a small space as you could probably fit your whole wardrobe in there even.
Lastly, it’s not all that hard to do. If you can handle assembling a KALLAX, you can do it.
Styles may have changed, yet the steps to hacking a simple bed frame remain the same.
How to make an IKEA platform bed?
Step 1: Assemble Materials Into Platform
Assemble the shelving units and place them in the right formation according to your required bed size. Anchor the units together.
Step 2: Make the middle
Add support for the mattress. You can use wood slats, plywood or mdf board.
Step 3: Finish with storage
Add storage bins, drawers, headboard, etc.
So easy as you’ll see in these 30 second TikToks.
@lara.sophie2806 DIY IKEA BED ##365DaysQuarantine ##ikeatok ##ikealife ##ikeahack ##bed ##bedroom ##bedtime ##diy ##diyhomedecor ##diyprojects ##easy ##meintag ##frühlingsgefühle
♬ SugarCrash! – ElyOtto
Smart move from @lara.sophie. Lining up two 1×3 KALLAX units at the top of the bed allows her to use the KALLAX cubes as nightstands on the left and right. And provides enough width for a full size bed.
@property_genie_plymouth Kids bedroom makeover IKEA kallax cube shelves bed hack B&M flooring ##ikea ##ikeahack ##ikeakallax ##bandm ##bedroommakeover ##bedroom ##bedroomdecor ##kids
♬ Circus – Britney Spears
A pretty seamless one with tons of storage space on one side of the room, leading to 3 KALLAX 1×4 units to form the single bed. The mattress is held in place with Velcro.
@imherlesbiannnn89 Literally got fed up with no storage in our bedroom ##fyp ##builduourown ##dreambed ##foryoupage
♬ original sound – Kboutin

A different style but looks so much more complete, with the addition of a king size BRIMNES headboard. She used three 1×4 KALLAX units, double bed slats and 12 DRÖNA storage boxes. The result is a very comfortable sleeping and storage solution.
More ideas on building a versatile platform bed frame
Blast from the past – IKEA EXPEDIT
IKEA item used:
Two EXPEDIT 1×5 units (or three KALLAX 1×4 units)
Other materials:
A piece of plywood
Two 4x4s and two 2x4s
T brackets, screws and nails.
You will also need two EXPEDIT shelving units (which is discontinued. The KALLAX will work just as well.)

My husband began by building the base out of 4×4 posts and 2×4’s to brace between them. The height of the 4×4 posts was just a bit taller than the shelving units that were going to be slid next to them. Cut a piece of plywood just an inch or two smaller than your mattress. Center the plywood on top of your base and attach it with nails to your 4×4 posts.
After the base was complete, I wrapped black felt across the top of the plywood and wrapped it under to cover the bottom of the plywood as well. I used a staple gun to keep it in place. This will protect your mattress and also the shelving unit you will slide under it.

The next step is to simply slide your EXPEDIT shelving units under your plywood. The base plus the shelving units really makes the bed quite sturdy. We used a full size mattress on our platform bed, but I’m sure you could adjust this to fit a queen or twin (with one bookcase) as well.
See the full tutorial of the IKEA EXPEDIT Platform Bed on my blog.
Thank you!
~ by Love Bug Living
Perfect solution for studio apartments
QUEEN PLATFORM BED
IKEA item used:
EXPEDIT shelving unit
- Two 1 x 5
- One 1 x 2
- Two 1×1
(For a KALLAX version, go to this post.)
We were inspired by other IKEA bed hacks, specifically this one and decided to make a Queen Platform bed. My daughter moved into an apartment and we needed to have more storage solutions as well as a nice size bed.
We were very excited that we (two females without any experience) could create this bed.
We used 2 1×5 bookcases, 1 1×2, and 2 1×1 bookcases so that we can get as close to a queen size (60×80) as possible.
The first thing was to go to Home Depot. We used a 4x4x12 but got them to cut them into 8 17.6 inches, which we used as support posts.

Next, we added brackets to the top end of the post to secure them to the shelving unit.


We attached a continuous hinge to join the 2 pieces of 60×40 plywood, so that she can have storage under the bed as well.
A black piece of fabric was used to cover the plywood.
We used brackets and 3/4 size screws to attach the posts to the plywood.

Lastly, we added lots of pillows and cushions to create a cozy bed.
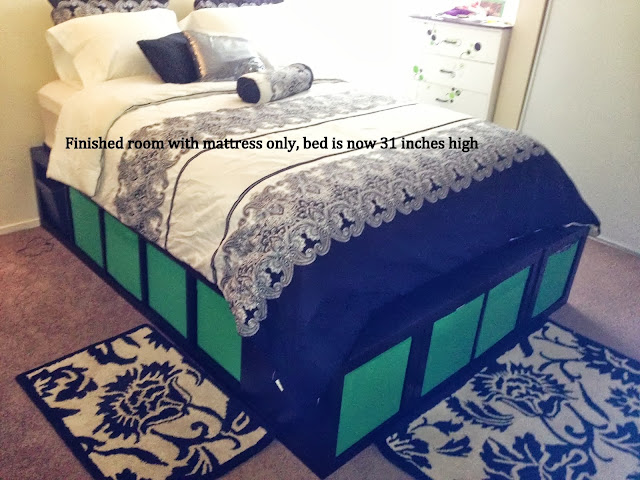
I think that’s it.. enjoy.
~ KT, United States
The post IKEA Platform Storage Bed – The Best Way to Save Money on Sleep appeared first on IKEA Hackers.


Comments
Post a Comment