
Rolling laundry cart made from KNAGGLIG boxes

Rolling laundry cart made from KNAGGLIG boxes

Materials:

  • 4x KNAGGLIG boxes – the bigger ones
  • 4x RILL wheels (one set)
  • 3x hinges from a hardware store
  • 8x 15-20mm wood screws to join the crates
  • 12x 8-10mm wood screws for the hinges
  • 16x 10mm wood screws or slightly longer bolts + nuts to attach the wheels

This cost me about 60 euros.

IKEA KNAGGLIG storage box

Photo: IKEA.com


My goal was to make a simple laundry cart for a room in the attic with a very low ceiling, 2ft/60cm at its lowest. It had to be easy to move around, have several compartments, affordable, and nice to look at.

Instructions for KNAGGLIG rolling laundry cart / storage box:

1. Assemble the KNAGGLIG crates according to the instructions.

2. Attach two crates side by side using a total of four short wood screws that go through the topmost and the lowest piece of wood. Make sure alignment is good. The crate might be slightly crooked.

3. Repeat for the other two crates.

4. Stack the crates and attach the hinges. One in the middle and one in each end.

Rolling laundry cart made from KNAGGLIG boxes

5. Attach the wheels to the bottom.

Rolling laundry cart made from KNAGGLIG boxes

6. Make sure any screws didn’t poke through the wood on the insides of the crates. If they did, cut and file off the excess.

Rolling laundry cart made from KNAGGLIG boxes

Note that my cart doesn’t have a frame. You don’t want anyone sitting on it. It might not be a good idea to store bowling balls in it either. However, it’s very easy to add a frame to the bottom if you need a stronger cart. With this design you also need to lift whatever is in the topmost crates in order to access the lower ones. Works great for sorting laundry or other light items.

Rolling laundry cart made from KNAGGLIG boxes

This design is easy to customize. Want just a laundry cart with two large containers? Leave out the bottom part between crates. Want a lid for the cart? Use the KNAGGLIG bottom: invert the top crate, then invert the bottom of the top crate to make a smooth top. Add hinges.

Happy hacking!

~ by Mikko


More ideas for laundry carts

Laundry trolley

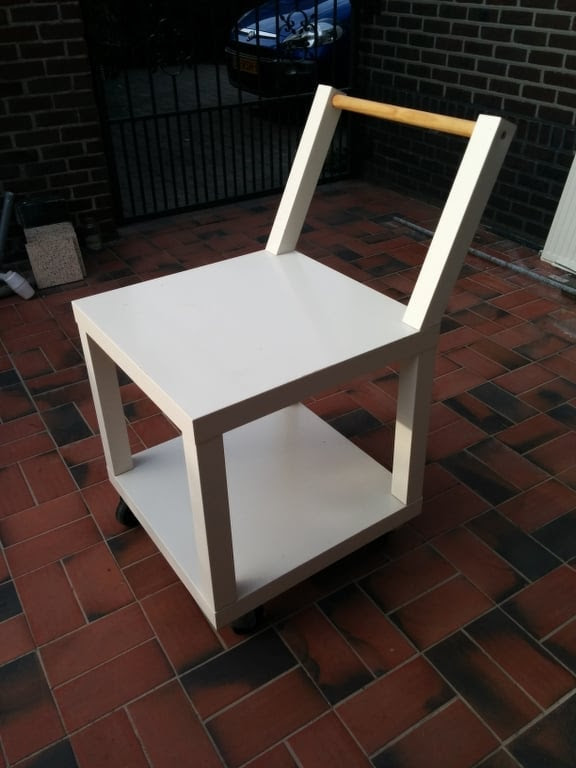
Joos hacked this small trolley for his grandma to carry around her laundry or other heavier stuff. Made out of two LACK tables, some wheels and a broom stick. Read more.

Salvage the ANTONIUS laundry basket with mesh. See more here.


The post Rolling laundry cart made from KNAGGLIG boxes appeared first on IKEA Hackers.

Comments

Popular posts from this blog

SKÅDIS: 5 ways to make the IKEA pegboard even better

IKEA introduced its own pegboard system, SKÅDIS, two years ago and I’d say it’s one of the best systems IKEA launched in recent years. I love how super customisable it is, with a growing range of accessories that help keep things organized. It works everywhere, in your wardrobe to bathroom . Probably anywhere you have a flat surface to hang it up. Photo: IKEA.com SKÅDIS pegboard system See it on IKEA.com But no matter how perfect a system, you can trust IKEA hackers to improve on the SKÅDIS. And they’ve settle these 5 issues you may have faced with the handy IKEA pegboard. Read on for their fixes. 5 IKEA SKÅDIS issues and fixes #1 Expensive hooks? You’ll need quite a number of hooks and accessories to fill up the SKÅDIS pegboard, and Kenyer was shocked at how quickly they all added up. So he figured he could make his own hooks to save cost. Photo: Kenyer Over at Instructables , he shows us how to twist copper wires into the SKÅDIS hook shape. It works s...

KALLAX desk ideas: Three ways to set up a workstation

Three great ideas for a KALLAX desk . #1 Compact, minimalist desk for laptop I put together a KALLAX desk for my laptop for just under 25 euros. Just a KALLAX 2×2 is needed. No other materials required. IKEA item used: KALLAX 2 x 2 (77 x 77 cm) KALLAX 2×2 | IKEA.com All you need to do is assemble 3 of the pieces in a U shape. That is all.  If you want to strengthen the structure you would need to drill a couple of holes in order to use the long middle shelf of the KALLAX unit as a back reinforcer. Easy and it works. ~ by Fabio Tudela #2 KALLAX standing desk I choose to stand at work because it makes me feel infinitely more productive. Our department recently moved into a new building and we had the opportunity to design our own spaces. Items Used: VIKA AMON / TORNLIDEN table top x 2 (discontinued, replaced by LINNMON ) KALLAX 4 cube x 2 KALLAX drawer unit x 2 8 – 3″ locking casters / wheels 1 – 6′ zinc brace I had a few VIKA AMON tables ...

Amped up KURA bed with drawers and safety rail

We saw other KURA beds with storage drawers underneath on this site. So, we also wanted the same — to make space for LEGO s and wooden trains under the bed. We installed the additional headboard panels because the configuration of the room and the location of the windows in the room meant that we wanted the children’s heads on the right and the ladder on the left. The KURA plans did not seem to allow this configuration, though I have seen online that there are models of this bed from 2003 that allowed more options for setup. Additional safety features Safety rail panel for the lower KURA bed helps our two year old feel secure, as he just transitioned from a crib directly to this bunk. Likewise metal handles on the ladder. They added a lot of confidence for both the five-year-old and the two-year-old when climbing up to the top bunk. We are aware that the bunk is now even higher than before and both children are under 6. Use caution and common sense before making these modifi...