
Box shelves: Make them really quick and easily

I hacked the IVAR shelving system, because I wanted to have stackable box shelves which are more flexible and easier to moving around. They also save space.

The hack wasn’t very hard to do and it took me just half a day, approximately 4 hours.

NOTE: Obviously, this hack is not suitable for homes with small children who may attempt to climb the shelves. The shelves will certainly fall as the individual units are not fastened to each other or to the wall.

IKEA items used:
  • 2 IKEA IVAR side units (the tall one)
  • 10 IVAR shelves

IKEA IVAR system

Other materials and tools:

Hack instructions for DIY box shelves

The general idea is to built independent ‘stackable box shelves’ you can later pile up anyhow you want.

The first thing to do is to saw the IVAR side units. Measure the lengths you want your box shelves to be. Make a mark on the side unit with a pencil and then, saw it.

You’ll need 2 sawn side units of the same length to make one box shelf. After sawing the side units set them aside for now.

I chose to paint the side units on one side. Feel free to paint to suit your home decor.

box shelves IKEA IVAR hack

Now, you can work on the shelves. Drill a hole at all 4 corners of each IVAR shelf. The hole should align to the top of the sawn side units.

After that, place the shelf panel on top of the sawn side unit and screw the shelf in. Repeat on the bottom to complete the box shelf.

(You may want to drill pilot holes on the tops of the sawn side unit, which will make it easier to screw in the shelves.)

And tadah!

You now have five stackable box shelves you can put on top of each other as you wish.

As the units are not fastened to each other or the wall, be careful how you stack the units and the items you place on them to maintain balance.

Recommended to place heavier items at the bottom unit.

box shelves IKEA IVAR hack

What I really like about the hack is the whole system of stackable box shelves stays flexible. I can easily disassemble and reconstruct it.

If I don’t like the look anymore, it’s possible to change the configuration of the box shelves. It also fits really well with my high walls.

~ by Kolja


You may also like these IVAR storage hacks

#1 Floor to ceiling built-in bookcase

full height built-in bookcase

I would like to share my hack of IKEA IVAR shelving system into a built-in bookcase. It all started with the wish to have a bookcase that could store all the books we still had in the moving boxes. Read more on the IVAR built-in bookcase.

#2 IVAR goes chinoiserie

Ivar storage chinoiserie cabinet

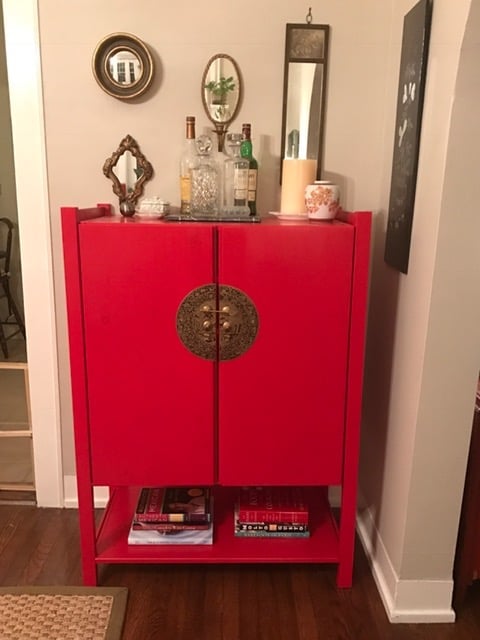
I recently made an IVAR cabinet go chinoiserie. What I used was the 20″ deep IVAR cabinet, two 20″x49″ IVAR side units, and an extra 20″ deep shelf (in addition to the two that come in the cabinet.) Read more about the IVAR chinoiserie cabinet.

#3 Massive IVAR workstation and storage

IVAR workstation

I was searching for the right height standing workstation for months until I came across the IVAR system from IKEA. It’s completely modular so you can set the desk height and cabinet configuration however you’d like. Read more about the massive IVAR workstation and storage.


The post Box shelves: Make them really quick and easily appeared first on IKEA Hackers.

Comments

Popular posts from this blog

Hackers Help: How to attach headboard to ESPEVÄR mattress base?

I’m trying to figure out if a headboard can be attached to an Espevar Mattress Base , and how to accomplish that. I’m looking at a standard metal headboard (because I just prefer the look of curved metal to what IKEA offers) and am not interested in a slat base with just a mattress on top, and a wall mounted headboard is not an option due to renting. Thanks for any help! ~ Amy *** Hi Amy I’ve not seen the ESPEVÄR in person but I believe it is possible to attach a headboard to it. From the website, the ESPEVÄR looks like a regular wooden slatted mattress base under a bed base slipover. As to how to attach it, that will depend on the fittings on the metal headboard. So you will just need to get the right hardware to secure the metal headboard to the wooden frame. And make some small openings on the slipcover to let the fixtures to go through. Jules Photo: IKEA.com Try these free-standing headboards for size A lime green and white headboard that takes centerstage in the r

Should You Decorate for the Holidays If Your Home is on the Market?

‘Tis the season to be jolly, but should your home reflect the joy of the season if you’re also trying to sell it? If you love to decorate for the holidays, missing out on this once-a-year opportunity might sound like torture. On the other hand, you don’t want to miss the chance to sell your home because of your decorations. So, should you decorate for the holidays if your home is on the market? We’ve got some “nays,” “yeas,” and “other considerations.” No, Don’t Decorate An elaborately-decorated home in Houston. Image: Regina Gust Designs Our first two realtors are against decorating for the holidays if you’re trying to sell your home. According to Anita Springate-Renaud, licensed partner and broker at Engel & Völkers Toronto Central , your festive decor can distract buyers from looking at the home’s raw design. “Elaborate decorations can distract and shift a prospective buyer’s focus away from what they should be looking at when shopping for a property.” So what should they

Kitchen renovation reveal: Rhombus wall steals the show

It’s been a while since I did a home tour. If you’ve missed the previous reveals, you can catch up with my Master Bathroom remodel and Guest Bathroom reveal . Today, let’s focus on my kitchen renovation. Hands down, this is the most used room in my home. I spend crazy amounts of time in here, even when I’m not cooking. Just off to the side of the kitchen I converted an awkward space into a reading nook . In the mornings, I sit and read or pray and meditate, before it gets too warm. And on the other side, there’s a work-in-progress plant wall / indoor garden which also takes up a lot of my time. So, all in all, lots of traffic in here, and that’s not even counting cooking and eating time. The kitchen is definitely my favourite room, because the transformation is huge and I love how it turned out. Kitchen renovation: The before House 17 when I first got it, actually had 2 kitchens, which is a very common “Asian” home concept. First, the “dry kitchen”, which is where you make simp